
It is possible to configure a INSYS device as a MQTT client and therefore connect it with Databoom MQTT broker.
Before starting
To connect your INSYS device to Databoom you need to create a new device on the platform with the type MQTT (not to be confused with the type MQTT external broker) or INSYS monitoring, in this case the MQTT parameters form is displayed too.
For the MQTT device configuration in Databoom read also: MQTT
To connect to MQTT broker it is required to note from Databoom:
- your own username;
- in the examplo the username databoom is used
- your own user namespace (from your profile in Databoom);
- in the example the namespace aFk1 is used
- an OAuth token (Settings 🡺 Credentials🡺 OAuth keys/Add OAuth);
- in the example the fake token kQHpPRPtiJcPa7FQCFaKUrnRABx2Fe/TnzzzkZD9R9M= is used
- your device token (from device details page).
- in the example the fake token 0ewpu6ewmj is used
- the topics for publication/subscription of your device (from your device details page);
- in the example the following fake topics are used:
- MQTT/0ewpu6ewmj/data for publication
- MQTT/0ewpu6ewmj/info for subscription
TIP! It is strongly recommended to create a different OAuth token for each client, to grant a better security.
Access the device interface
Connect to the INSYS device web interface. The default settings are:
- Indirizzo, 192.168.1.1
- Username, insys
- Password, icom
The next step is to access the "Monitoring" section.
Monitoring -> Setup application
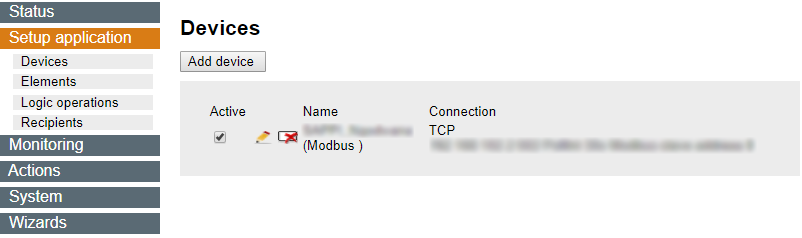
After adding the connected devices and their signals according to your needs (respectively in "Devices" and in "Elements"), you need to set a timer and a destination for the datafeeds containing detected measurements.

To add a timer , go in "Elements", choose the "Add element" option and then select "Timer" in Device. The type will be "recurrent timer" and you will have to choose an interval of no less than 1 minute (Databoom only considers a single value for signal, when multiple values are sent in the same minute, the last received is used).

Now go in "Recipients" to add the destination of data.
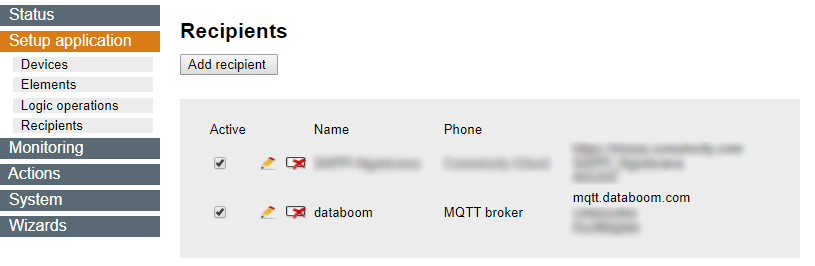
Click on the button "Add recipient" and then select the type "MQTT broker".

The options to set are:
- Server URL, Databoom broker address, mqtt.databoom.com
- Port, the port 1883
- User, Databoom user's username
- Example username is databoom
- Password, an OAuth token created by the user
- Example token is kQHpPRPtiJcPa7FQCFaKUrnRABx2Fe/TnzzzkZD9R9M=
- Client ID, formed by user namespace and device token following the pattern <user namespace>-<device token>;
- Example client id will be aFk1-0ewpu6ewmj
Monitoring -> Monitoring
Once the timer is set, you need to create an element that controls its expiration. In the Monitoring section, select "Add monitorning".

Once the "Element" option in Source is chosen, select your timer and the "finished" event. In this way the monitoring will report each time the timer expires, and may be used to perform particular actions.

Monitoring -> Actions
At this point you can create actions to take when the timer expires, that is sending data to the server Databoom. In "Definitions" click "Add Action" and choose the target "Server feed".
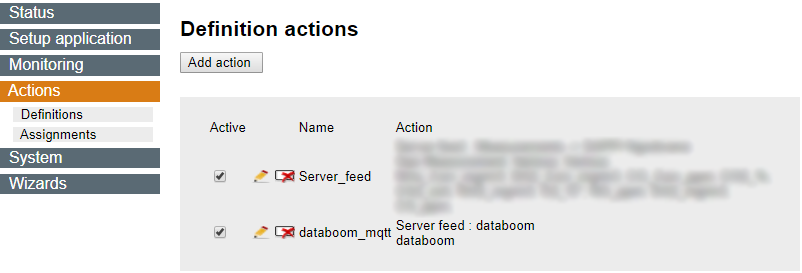

The fields need to be filled as follows:
- Recipient, select the recipient you created earlier
- Topic, the topic to receive sent data, consists of <project>/<device token>/<topic>, visualized in device details page
- With example data: MQTT/0ewpu6ewmj/data
- Message, INSYS variables to be forwarded, using the following format { "type": "data", "message": {"device": "<device token>", "date": $TIMESTAMP, "signals": [{"name": "<signal token>", "value": $VARIABILE_DISPOSITIVO_INSYS}]}}
- With example data:
{ "type": "data", "message": {"device":"0ewpu6ewmj","signals":[{"name":"MQTTSignal", "value": $MQTTSignal }]}}
- TIP! name is used as signal token in Databoom, value refers to the INSYS device variable, the value of which is referenceable with its description preceeded by $
- $TIMESTAMP can be skipped, publication date is used
- With example data:
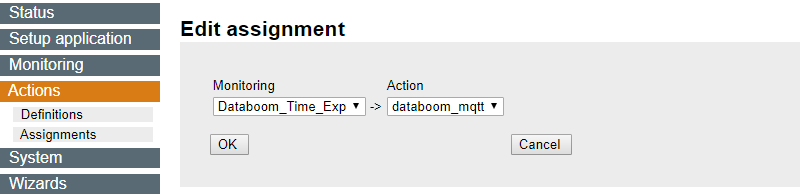
After the creation of the actions to be performed, is finally possible to associate them the monitoring, in order to enable the actual transmission of data. In the "Assignments" section click on "Add assignment", then select the monitoring and the action to be associated.

After this procedure, the datafeed containing the measurements specified in the action will be forwarded to the recipient Databooom at each timer expirations.
Configuration completed!
Once the procedure has been completed, Databoom starts to record data from the INSYS. To examine your data and have a correct representation, follow the instructions in Edit/validation of a signal.
0 Comments