

Omron NX1 PLCs can send data to Databoom through HTTPS or MQTTS by properly setting up configuration in Sysmac Studio platform.

Sysmac Studio software required version is v1.46 or greater, while PLC firmware needs to be the one in the above picture at least.
If you have a supported PLC but your firmware is not updated, you can contact Omron technical support to get the most recent version.
Creation of a Databoom device
In order to configure your Omron you need to create a device in Databoom first, so you'll have all the parameters for the Sysmac Studio configuration.
- Access Databoom
- Go to Devices from the left side menu
- Click the Add device button
- Select the device type Omron NX1, an additional form will show to set MQTT parameters
- If you're going to send data via HTTP you need to fill MQTT parameters in order to save device, you can ignore them in the following steps
- Of particular importance is the Topics where publish data field, this is generated by merging:
- a project, a value chosen by the user, eg. test
- the device token, eg. 0ro3ubpc5m
- publication topic, eg. push
- eg. test/0ro3ubpc5m/push

- Topic where it's possible to receive information from Databoom IS NOT required in PLC configuration but you need to fill it in order to complete device creation
- Fill the other fields and confirm the device creation
- In the device detail page buttons to download certificates are displayed, respectively:
- Certificate chain, databoom-ca.pam
- Client private key, client-key.pem
- Client certificate, client-cert.pem

- To configurate Omron PLC you'll need
- Device token
- ClientId
- Topic where publish data
- You don't need to add signals to the MQTT device in Databoom, they are automatically created at the first communication
- You need to create an OAuth token to authenticate in the side menu Settings -> Credentials
Sysmac Studio configuration
Once configuration in Databoom has been completed it's possible to proceed with configuration in Sysmac Studio.
The first thing to do is checking network settings to be sure the PLC can connect.
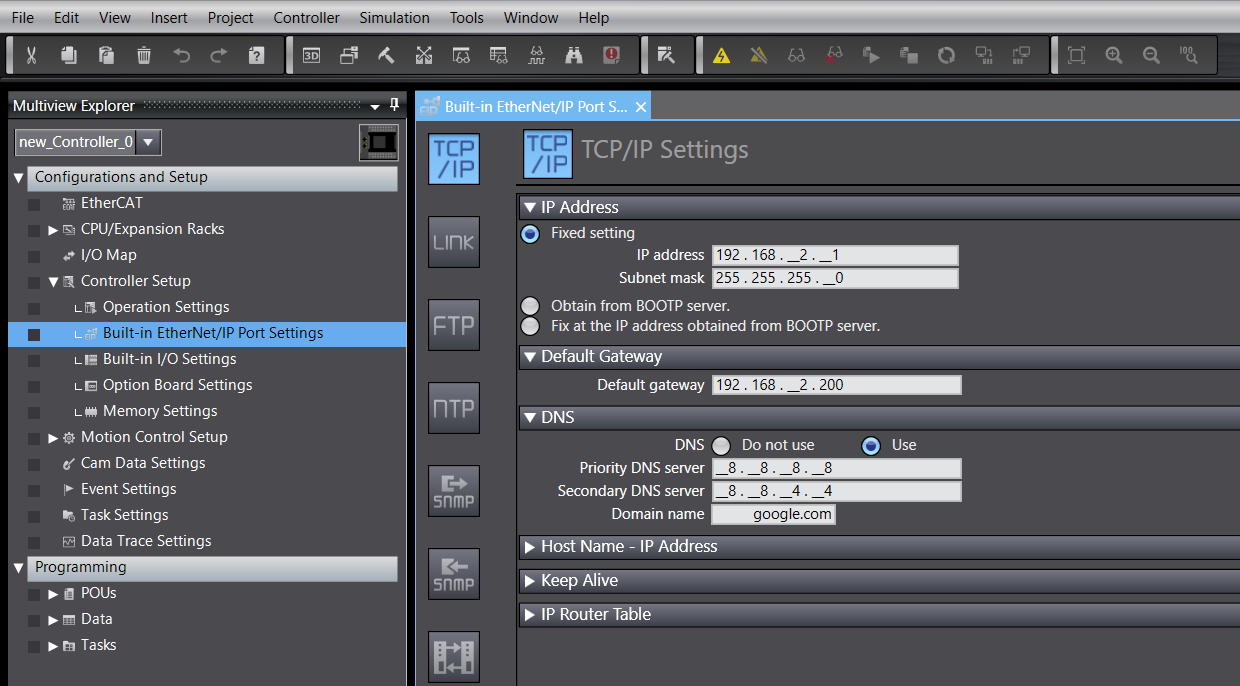
In the picture Google DNS is used, you can also use a different one.
You can now proceed with the specific configuration for
Sysmac Studio via MQTTS
- Download Sysmac Studio MQTT library from Omron website at https://www.ia.omron.com/product/tool/sysmac-library/

- Import the library in the Sysmac Studio project


- Once the library has been imported it is possible to create a MQTT client to connect to Databoom broker
You need to set the parameters from previous steps in the configuration: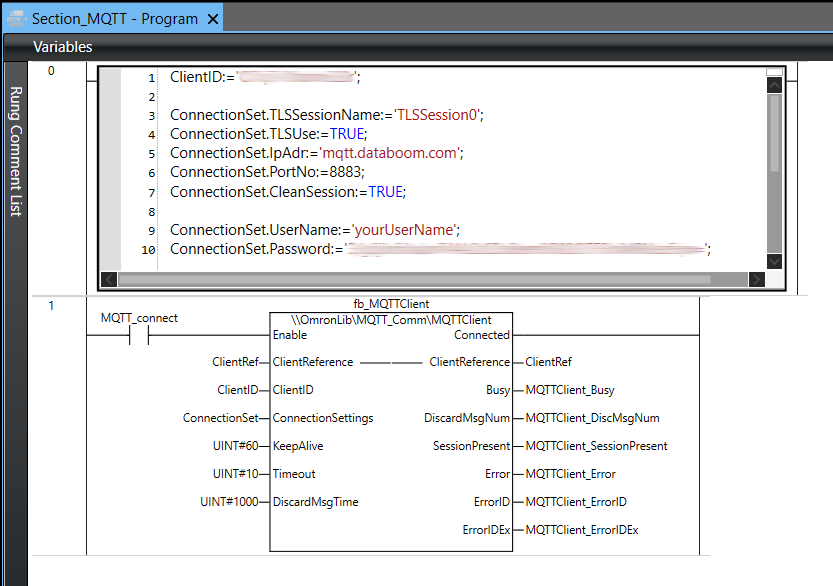
- ClientID, is the value displayed in MQTT form of device view in Databoom
- UserName, is the username you use to access Databoom
- Password, is the OAuth token generated in credentials page in Databoom
- Other parameters must be set as in the picture
- For TLS configuration you need to accomplish the following steps
- PLC must be in PROGRAM mode when you configure the TLS session
- Go to the Sysmac Studio TLSSettingTool directory

- Open a command prompt and type
tlsconfig setSessionInfo /id 0 /key client-key.pem /cert client-cert.pem /ip:192.168.2.1 /f

- id value in the command depends on TLSSessionName in the previous prorgam
- id 0 -> TLSSessionName = TLSSession0
Id 5 -> TLSSessionName = TLSSession5
- id 0 -> TLSSessionName = TLSSession0
- Once TLS configuration is completed you can proceed with data publish program

- txtJSON_MQTT payload must look like:
{
 "type": "data",
 "message": {
     "device": "DEVICE_TOKEN",
     "date": "2021-12-14-15:53:06.970794000",
     "signals" :
	 [
       {
         "name": "SIGNAL_1_TOKEN",
         "value": 111
       },
       {
         "name": "SIGNAL_2_TOKEN",
         "value": 222
       }
	 ]
   }
}
where DEVICE_TOKEN is the device token in Databoom and SIGNAL_1_TOKEN and SIGNAL_2_TOKEN are the token that will be used to create signals in Databoom- There are two ways to create the payload to send:
- Use the following string and properly fill token values
txtJSON_MQTT:= ‘{$"device$":$"DEVICE_TOKEN$",$"date$":$"2021-12-14-15:53:06.970794000$",$"signals$":[{$"name$":$"SIGNAL_1_TOKEN$",$"value$":111},{$"name$":$"SIGNAL_2_TOKEN$",$"value$":222}]}’ - Contact Omron technical support to get help regarding JSON Encoding and Decoding functions available in Sysmac Studio

- Use the following string and properly fill token values
- There are two ways to create the payload to send:
Sysmac Studio via HTTPS
- To send data via HTTPS you just need to set a program as follows

- For TLS configuration you need to accomplish the following steps
- PLC must be in PROGRAM mode when you configure the TLS session
- Go to the Sysmac Studio TLSSettingTool director, open a command prompt and type
tlsconfig setSessionInfo /id 0 /f /ip:192.168.2.1
- id value in the command depends on TLSSession in the previous prorgam
- id 0 -> TLSSession = TLSSession0
Id 5 -> TLSSession = TLSSession5
- id 0 -> TLSSession = TLSSession0
- post_data payload must look like
{
 "type": "data",
 "message": {
     "device": "DEVICE_TOKEN",
     "date": "2021-12-14-15:53:06.970794000",
     "signals" :
	 [
       {
         "name": "SIGNAL_1_TOKEN",
         "value": 111
       },
       {
         "name": "SIGNAL_2_TOKEN",
         "value": 222
       }
	 ]
   }
}
where DEVICE_TOKEN is the device token in Databoom and SIGNAL_1_TOKEN and SIGNAL_2_TOKEN are the token that will be used to create signals in Databoom
- There are two ways to create the payload to send:
- Use the following string and properly fill token values
post_data:= ‘{$"device$":$"DEVICE_TOKEN$",$"date$":$"2021-12-14-15:53:06.970794000$",$"signals$":[{$"name$":$"SIGNAL_1_TOKEN$",$"value$":111},{$"name$":$"SIGNAL_2_TOKEN$",$"value$":222}]}’ - Contact Omron technical support to get help regarding JSON Encoding and Decoding functions available in Sysmac Studio

- Use the following string and properly fill token values
- There are two ways to create the payload to send:
Configuration completed!
Once the procedure has been completed, Databoom starts to record data sent from the Secomea. To examine your data and have a correct representation, follow the instructions in Edit/validation of a signal.
0 Comments