

Databoom provides the possibility to connect your own device with a server (broker) through MQTT protocol. In order to transmit the data, it is necessary to correctly set up a device in Databoom and creating a client that sends the parameters in the required format. Follows the procedure for Node.js.
Read also: How to communicate with Databoom using MQTTBox or MQTTLens
MQTT device configuration in Databoom
Before creating a MQTT client to forward data to Databoom, it is necessary to create a device in the platform and configuring it so it can communicate correctly. While creating a device select the MQTT type. Once the type has been selected, communication fields are shown.
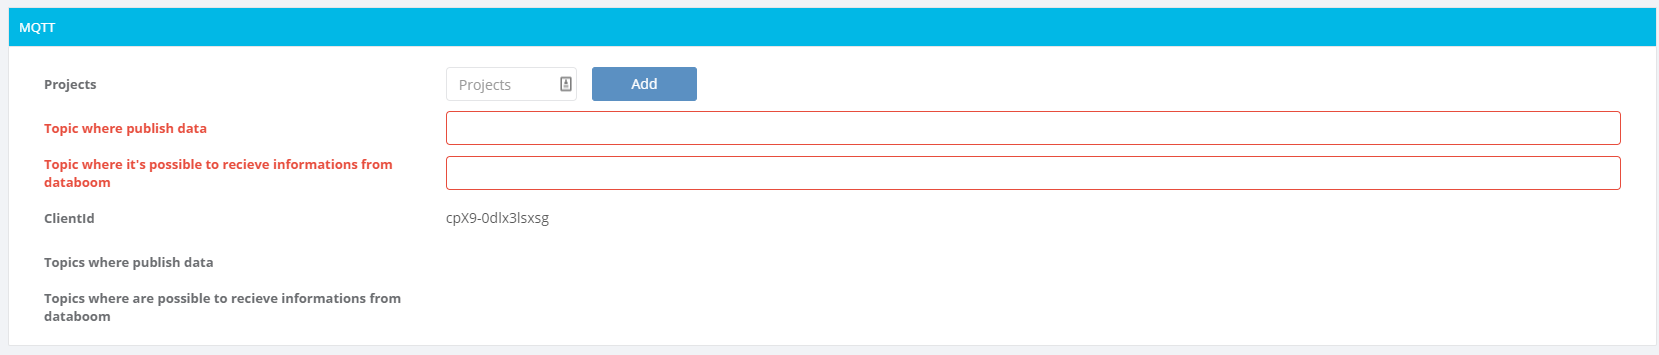
Topics of an MQTT device (and template) are:
- Topic where publish data, where the client will publish data in order for Databoom to receive and process them
- Topic where it's possible to recieve informations from Databoom, where the client may subscribe in order to receive info from Databoom
Projects field allows to specify one or more strings that willl be used as roots in the topics. By inserting more projects therefore more topics will be available for publication and subscription.
MQTT device topics follow the structure <project>/<device token>/<topic>
The device token is used, along with the user namespace, to form the ClientId to set in the MQTT client, that will follow the structure <user namespace>-<device token>.
As example, consider MQTTTest as project, data as publication topic and info as subscription topic, the so-formed topic will be displayed:
- MQTTTest/<device token>/data
- MQTTTest/<device token>/info
mqtt module
For the creation of a MQTT client in Node.js the mqtt module is used
npm install mqttIn your code the following fragment is then required:
var mqtt = require('mqtt');
Creation of a MQTT client in Node.js
Client creation follows the structure:
var settings = {
    clientId:"<user namespace>-<device token>",
    username:"<Databoom username>",
    password:"<Databoom oAuth>"
};

var client = mqtt.connect("mqtt://mqtt.databoom.com:1883", settings);
The clientId is formed by the user namespace, viewable in the personal profile, and the device token, viewable in its details page, following the <user namespace>-<device token> pattern. The so-formed clientId is viewable in the details page of the MQTT device in Databoom.
To authenticate to the MQTT broker you need your username an OAuth token generated in Databoom with Publish and Create permissiosn
- In Settings -> Credentials side menu, click the Add OAuth button in the OAuth keys box
- To grant better security we reccomend to create a new OAuth token for each istance of the template
Broker address is mqtt.databoom.com, on port 1883, so mqtt://mqtt.databoom.com:1883 is used.
Parameters format to forward
Parameters to forwarded to publication topic (MQTTTest/<device token>/data in the example) must be in JSON format, in particular the following model is used:
{
 "type": "data",
 "message": {
     "device": "<device token>",
     "date": "<data>",
     "signals" : [
       {
         "name": "<signal token 1>",
         "value": <signal value 1>
       },
       {
         "name": "<signal token 2>",
         "value": <signal value 2>
       }
     ]
   }
}
<device token> is displayed in the Info box in the device page.
date field isn't mandatory, if it's not specified reception date is used.
Signals tokens, <signal 1 token> and <signal 2 token> in the example, can be copied from the device page or in the corresponding signal detail pages.
If you want to update a signal existing in Databoom, name must correspond to the existing token. If the signal doesn't exist in Databoom, it is newly created using name as token. The value must be unique.
Parameters are then converted to string so they can be correctly published on broker topic
post_data = JSON.stringify(post_data);
Publishing data on topic
Once the parameters creation has ended, it is possible to proceed with the publication on the topic of Databoom broker. Consider the example topic MQTTTest/<device token>/data
client.publish("MQTTTest/<device token>/data", JSON.stringify(post_data), function () {
    console.log(newDate().toISOString(), "\tDATA PUBLISHED ON", "MQTTTest/<device token>/data");
    console.log(JSON.stringify(post_data));
});
Publication topic can be retrieved in the device details page in Databoom, it must follow the pattern MQTTTest/<device token>/data (where MQTT and data are customizable by the user), data is ignored otherwise. post_data must be a string. In the callback some log messages are printed to confirm parameters forwarding.
It is also possible to subscribe to the events topic. It can be retrieved in the device details page in Databoom, it must follow the pattern MQTTTest/<token dispositivo>/info (where MQTT and data are customizable by the user).
client.on('connect', function () {
    console.log(newDate().toISOString(), "\tCLIENT CONNECTED TO DATABOOM BROKER")
    client.subscribe('MQTTTest/<device token>/info');
});

client.on('message', function (topic, message) {
    console.log(newDate().toISOString(), "\tDATA PUBLISHED ON", "MQTTTest/<device token>/info");
    console.log(message.toString());
})
Alarm creation
It is possible to create an alarm in Databoom by publishing on data topic. The syntax to use is the following:
{
    "type": "alarm",
    "message":  {
      "dateOn": "2018-04-13T09:00:00+02:00",
      "description": "This is a MQTT alarm test",
      "note": "Extended alarm description",
      "status": "ON",
      "ack": "NACK"
    }
}
Fields to forward to create an alarm are the same fields visualized in Databoom. In particular:
- status indicates if the alarm is active ON or deactivated OFF
- ack indicates if the alarm has been acknowledged ACK or less NACK
- Alarm statuses are:
- New, with status ON and ack NACK
- Active, with status ON and ack ACK
- Off, with status OFF and ack NACK
- Solved, with status OFF and ack ACK
- The message must contain dates according to the alarm status:
- New (ON/NACK) requires dateOn
- Active (ON/ACK) requires dateOn and dateAck
- Off (OFF/NACK) requires dateOn and dateOff
- Solved (OFF/ACK) requires dateOn, dateOff and dateAck
- If dateAck is not present in the payload and the ack field is ACK, reception date is used instead
- By adding a custom ref field in message, it is possible to refer an existing alarm and therefore update its status (without ref field a new alarm is created for each message)
- Alarms generated with a ref field are listed with the field displayed in the description cell

- Alarms generated with a ref field are listed with the field displayed in the description cell
Creating an event
It is also possible to create event by posting data following the schema:
{
    "type": "event",
    "message":  {
        "description": "MQTT event",
      "from": "2018-04-13T09:00:00+02:00",
      "to": "2018-04-13T10:00:00+02:00",
        "link": {
            "device": "<device token>",
            "signal": "<signal token>"
        },
      "tags": [
        "mqtt"
      ]
    }
}
Fields to forward to create an event are the same fields visualized in Databoom (in notes widget):
- from and to represent start and end dates of the event;
- link allows to link an element to the event;
- tags allows to assign tags to the event.
Transformation function for published data
Content will be therefore processed by the transformation function and values stored in the signal.
The function must return one or more values (array []) in the accepted format:
{
    "date": <DATE>,
    "value": <VALUE>
}
![]()
In the example you can see the function doIt
function doIt(payload) {
    return {
        'date': new Date(),
        'value': (payload[1].charCodeAt(0) - 97)
    };
}
payload parameter allows to access the published data and process them in order to return them in a compatible format. In the example the value is calculated by subtracting 97 to the code of the first character of the first payload component.
Done!
Once the procedure has been completed, Databoom starts to record data sent with MQTT. To examine your data and have a correct representation, follow the instructions in Edit/validation of a signal.
0 Comments